


During our scavenge hunt workshop you have experienced the magic of a scavenger hunt for learning and teaching. Now it is time to create your own learning hunt using your own lesson plan material. But you do not have to do this on your own! This is also the perfect opportunity to collaborate with:
- the teachers in the same phase as you (mix up maths and language questions)
- peer teachers who teach the same subject as you.
- Subject or phase based teachers from other schools.
- or you yourself on your own.
Step 1: What do the learners need to learn?
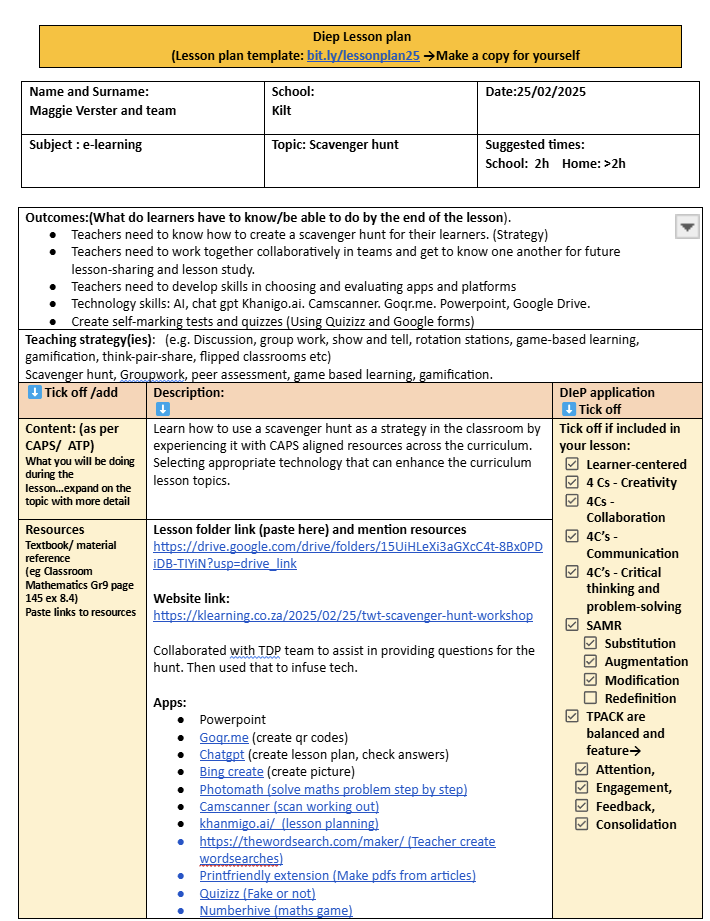
Is it a revision lesson consolidating what they have learned during the term or section?
Is a new section or topic that you want to introduce to them in a fun way?
No matter the reason, you need to start with the CAPS/ATP objectives and outcomes for your topic. Think about and choose questions that can be changed onto scavenger hunt challenges that will make you learners:
- Think (solve a problem, do a calculation, interpret given information etc)
- Collaborate (They have to work together as a team and read with understanding. It can also just be fun questions that helps them to work together towards a common goal, forcing them to be inclusive)
- Communicate (asking them to record discussions, opinions or how they understand a problem by creating videos or voice messages)
- Create (videos, podcasts, drawings, simulations)
Make sure that you cover ALL the objectives and outcomes of the lesson topic.
Step 2: Start with your lesson plan and scavenger hunt template
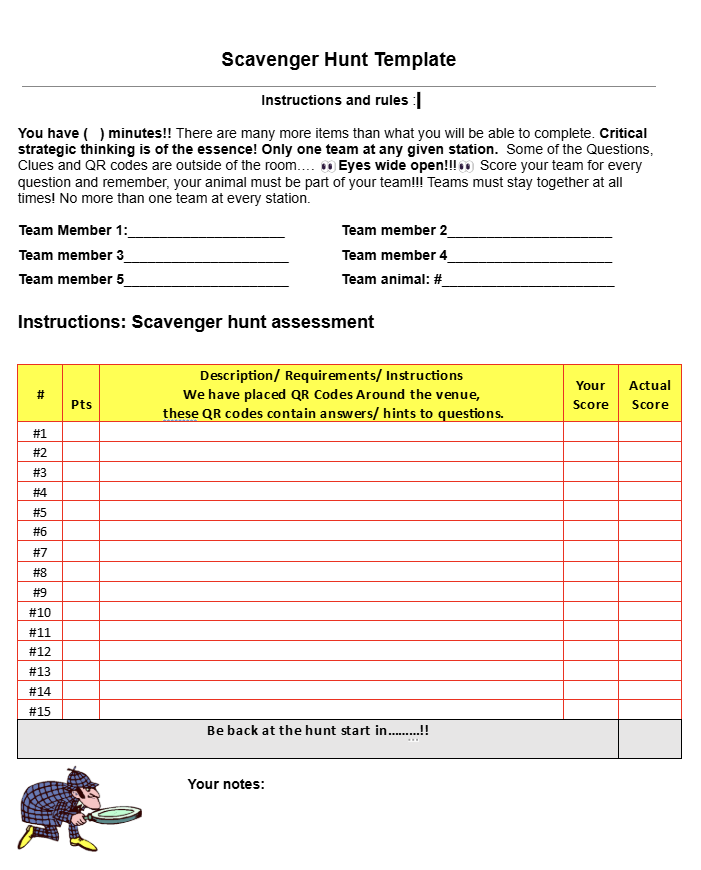
It is time to start populating your scavenger hunt with exercises and activities for your learners to follow. Adapt the questions to suit the level of your class. The idea is to move the learners around in groups of 4-5 to the various stations randomly. (No more than one team at a given station (Clue/activity) )
Some pointers:
- Make sure that you mix up the difficulty level of your clues/activities
- Add some fun activities as well, like:
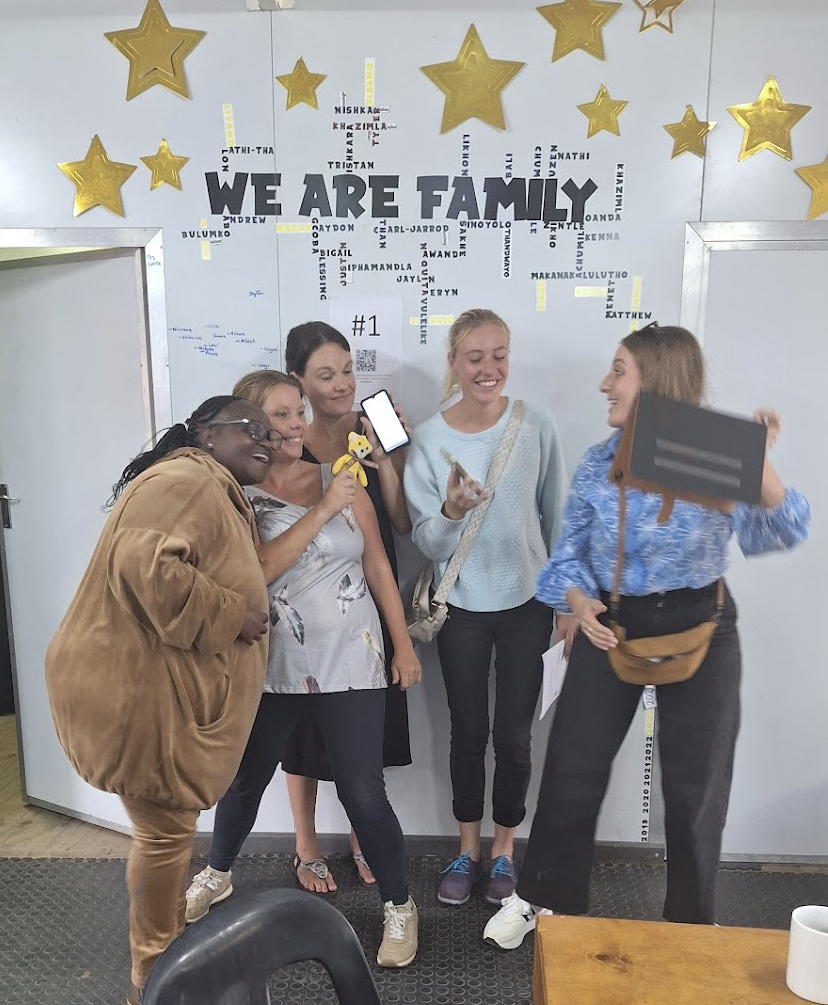
- Take a selfie of the whole team at a (add a specific place in the classroom/school/landmark)
- Do a group photo of your feet looking happy.
- Ask the questions with proof of understanding/teamwork/evidence in mind. (They have to prove that they did it and can explain it.)
- See the example lesson plan for the scavenger hunt workshop
- See the example Question sheet for the scavenger hunt workshop
Step 3 Add the tech (if necessary)
When adding tech to your scavenge hunt, you can do it in the following ways:
| What? | Yes/no If you don't have internet, only use the text function for QR codes | Need Internet? |
| QR codes | Work out the following and have each member record a video explaining a different step of the problem. | Yes/no If you don't have internet, only use the text function for QR codes |
| A maths problem | Work out the following and take a video of each member explaining a different step off the problem. | No |
| A discussion | Record your discussion (no longer than 2 minutes) | No |
| A maths problem | Scan your working out (Camscan) or photo | No |
| A poem | Create a poem using Chatgpt | Yes |
| Answer questions | Draw the story (any of the drawing apps on a tablet) or in a browser (need internet) | Yes |
| Read/listen to the story | Draw the story (any of the drawing apps on the tablet) or in a browser (need internet) | No |
| A maths simulation | Put the laptop with the simulation at the station or scan the qr code to the URL and let them take a photo/screenshot of their solution | Yes/no |
- Finalise your question sheet and save it as "Questionsheet" This is the sheet that you will hand out to your teams.
- See the example of our scavenger hunt question sheet
Step 4 Create your answer sheet and insert your QR codes for reference

You will now create the "Answersheet" (The sheet that you hand out when they come and do the assessment part of the scavenger hunt)
- Add just enough information (and the answers) so that the teams can evaluate/debate each other's answers.
- See our scavenger hunt answersheet
- Create your QR codes (if you are going to use that) and paste into the answer sheet in "Your score" column so that you can save it as your Master Sheet (questions, QR codes and answers)
- Create your question posters to paste around the classroom or schools. Make sure that each poster has enough information to assist the learners in completing the activity. Add the QR codes from your master sheet and make it big enough to scan.
- Practical hints:
- Paste the QR codes, taking care to place the poster questions that need internet in a place where they will have access.
Step 5: Time for action: Part one: The Hunt
- Make sure that you allocate enough time for the scavenger hunt (a double period), as it consists of two parts: the "Hunt" and the "Hunted"!
- Divide the learners in groups of 4-5 and let them choose a team animal (they can draw it together on a sheet and take a photo or carry the drawing with them.
- Explain the rules of the game.
- Make sure that they understand that they have to stay together
- They need to have proof for every question that they answer . (Photos, videos, or written on sheet).
- No more than 1 team at a QR code/station.
- They won't have time to complete all the questions and need to work cleverly!
- Stick to the time limit- Let them set a timer. Latecomers get penalty points.
- Off they goooooooo!
- Make sure that you circle around and assist with hints and questions to guide them... do not give answers!
- Yell out the time left every now and again
Step 6: Time for action: Part two: The Hunted
You can do this part as a debrief and marking session, where each of the groups swaps and you go through the answers together, but it is not NEARLY as much fun as to let them "fight it out". This gives them the opportunity to explain their answers and understanding!

- Give them a few minutes as a group to organise their answers (photos, videos, pictures etc) and check their understanding with each other.
- Let 2 of one group (hunters) swap with 2 of the next group (clockwise) until all groups have got markers and defenders who will produce the evidence and explain the answers if needed.
- The "Markers" can deduct marks for too little evidence, and the idea is that the defender must be confident about their proof and explanation.
- If there is a dispute or misunderstanding, the game master (you, the teacher) has the final say.
- Remember to keep a noise meter on, as things can get heated! (https://bouncyballs.org/)
- When the time is finished, collect all the marked sheets and announce the winners
(Download or play Drumroll)
Please join our discussion forum about the scavenger hunt on Facebook and tell us what you are planning, how it went, and how you would adapt your lesson or strategy. (#Collaboration badge)
Step 7: Evaluate your lesson using our rubric.
This year you will be required to do a self-evaluation of all your (4) e-lessons and one assigned peer review as part of our collaboration and feedback drive!